
In 2025, thriving software organizations and struggling software organizations aren’t separated by their level of innovativeness or raw talent—they are separated by their level of operational discipline. There are thousands of Indian companies that write code; only the top class do so systematically, with repeatable processes, quality gates, and mechanisms for continuous improvement baked into every stage of development.
In this article, we reveal the engineering, QA, and DevOps playbook of India’s best software companies – the operational backbone that transforms frenzied development into predictable, high-quality delivery. This is not theoretical “best practices,” but the methodologies that real-world companies, such as Ateam Soft Solutions and many other Tier 1 vendors, use every day.
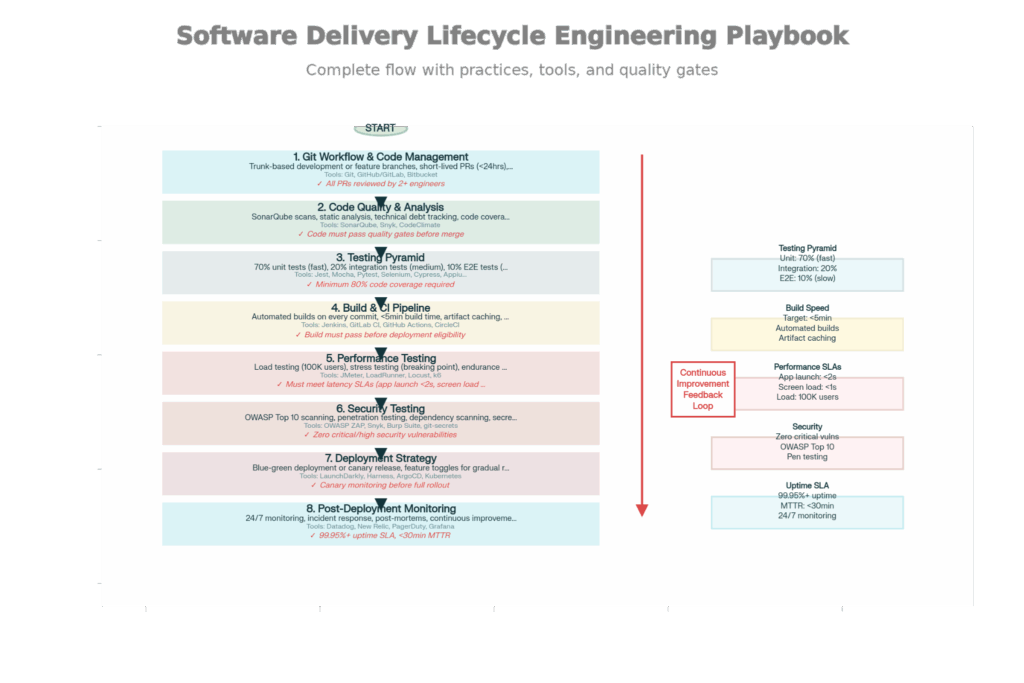
Full Software Delivery Lifecycle: Top Development Companies’ 8-Phase Engineering Playbook
Leading development houses operate under a well-defined 8-phase delivery lifecycle. Each phase has defined practices, tools, and quality gates. The stages are interlinked such that weaknesses in one stage magnify into later-stage problems.
Why This Stage is Important: How developers structure and combine code affects how often they experience merge conflicts, deployment risk, and team coordination. Bad branching policies result in creating nightmares for integration; good ones make daily deployment possible.

Comparison of Git Branching Techniques: Trunk-Based, Feature Branching, and Git Flow
There are three major Git branch strategies that you can use, each with its own pros and cons:
Process: Developers commit straight to the main branch (the “trunk”) several times a day. Work-in-progress features are hidden behind feature toggles (if/else statements governed by configuration) rather than branches.
Key Features:
When This Is Used By Top-Tier Companies: High-velocity teams creating features that ship frequently. Code changes are merged continuously, and conflicts are surfaced within minutes instead of days. 5+ daily deployments are common for companies doing this.
Advantages & Disadvantages:
✅ Encourages collaboration and rapid feedback
✅ Easier to maintain a stable main branch
✅ Enables daily deployments
❌ Requires robust automated testing (can’t rely on long review periods)
❌ Demands discipline (all developers committing to main)
Flow of work: Developers independently create feature branches (e.g., feature/user-authentication) and then merge back to main via pull request when they have completed their work. Other developers will review the pull request prior to merging.
Key Features:
When Top-Tier Companies Are Doing This: Medium to large teams (15-50 people) that require code review discipline. Distinct separation between development and main to avoid unintentional breakage. Standard for companies doing 1-2 deploys daily.
Advantages & Disadvantages:
✅ Code review before merge prevents obvious mistakes
✅ Clear feature isolation
✅ Easier to understand “what’s in this release.”
❌ Longer-lived branches lead to more merge conflicts
❌ Integration happens less frequently (delayed problem discovery)
Workflow: There are several types of branches, all for a specific purpose: main for releases, develop for development, feature/* for individual features, release/* for release branches, hotfix/* for production fixes.
Key Features:
When Top-Tier Companies Use This: Large teams (50 or more team members) with planned release cycles and several versions in the air simultaneously. An enterprise where you have to support versions N, N-1, and N-2. Common for firms that do 0.5 deployments a day (one every two days).
Advantages & Disadvantages:
✅ Clear structure for managing multiple versions
✅ Formal release process reduces chaos
✅ Easy to hotfix production without disrupting development
❌ Most complex workflow, highest overhead
❌ Merge conflicts most frequent
❌ Slowest path to production
Best Company Practice: The majority of modern, high-speed companies use trunk-based development with feature toggles. It removes the integration lag that feature branching suffers from, as well as the complexity of Git Flow. However, it requires advanced feature toggle management (such as LaunchDarkly) and strong testing discipline.
Why This Phase Matters: Some issues are caught by human code review, but automated analysis catches 10x more. Static code analysis tools process source code to detect bugs, security vulnerabilities, and design smells before code gets to production.
First-class companies have SonarQube as part of their CI/CD pipeline. Every code commit triggers automatic analysis:
What SonarQube Looks For:
Code Smells: Signs of bad design (duplicated code, too long method, too many parameters). They aren’t breaking functionality, but they do make the code more difficult to maintain. SonarQube detects these and recommends refactoring.
Bugs: Logic errors that SonarQube detects based on static analysis. Sample: null pointer dereferences, unreachable code, and logic errors in conditions.
Security Vulnerabilities: Insecure code patterns (hardcoded passwords, potential SQL injection, and cryptography that is not secure). SAST (Static Application Security Testing) in SonarQube.
Code Coverage: The amount of code exercised by automated tests. SonarQube reports on coverage and complains if coverage drops (e.g., “New code must have 80%+ coverage”).
Tech debt: SonarQube measures tech debt – how much work it will take to remediate all the issues. Teams follow debt to see if it’s going up or down over time.
Quality Gates: Rules have to be passed before a merge with SonarQube:
If the code doesn’t pass these gates, the pull request will not be merged — the developers are required to fix the issues first.
The End Result: When developers commit code, SonarQube runs an analysis in under 2 minutes and populates the pull request with findings. Developers get immediate feedback: “Your new code contains 3 code smells and 1 potential bug.” They resolve issues while the code is still fresh in their brains, not months later.
Why This Phase Matters: Testing is costly. To run all the critical user journeys as end-to-end tests would have required thousands of tests, which would have cost millions to run every day. The testing pyramid balances the testing investment by favoring running cheap and fast tests at high frequency and running expensive and slow tests at low frequency.
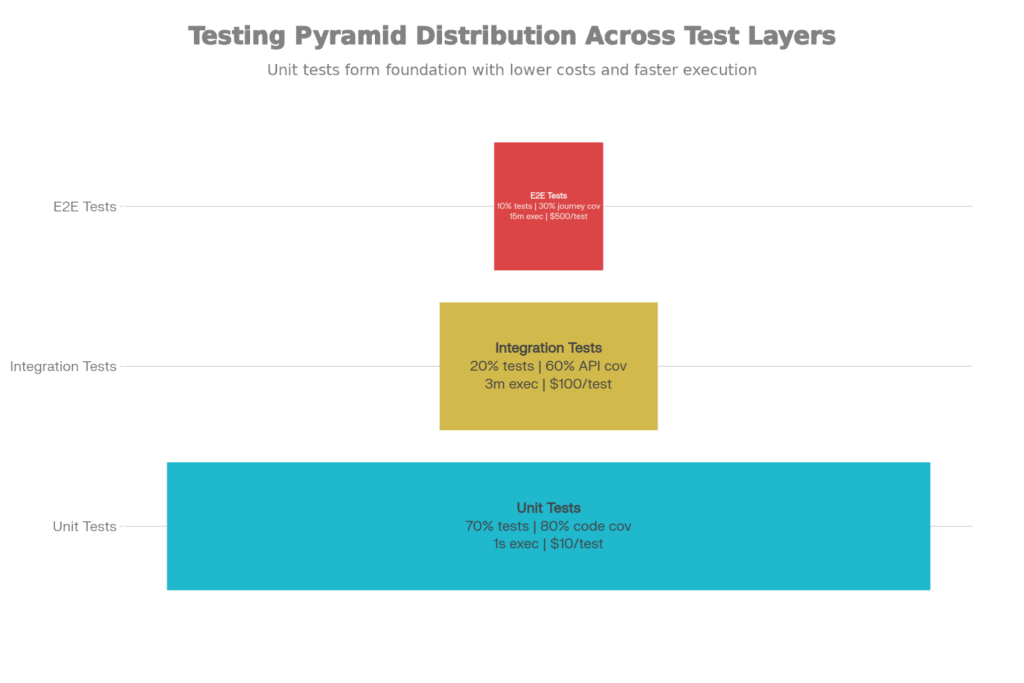
Testing Pyramid: Cost-Benefit Analysis, Coverage, And Distribution Of Tests
The testing pyramid has three levels with different purposes, each tailored for its audience:
What They Test: Functions and classes that run on the edge of your application. Testing that function that takes arguments has them and returns (multiplying by 2).
Features:
When to run: On every commit. Developers have seconds to get feedback and make fixes immediately.
Sample: Testing a JavaScript function that calculates payments:
javascript
test(‘should calculate transaction fee correctly’, () => {
const calculateFee = (amount) => amount * 0.029 + 0.30;
expect(calculateFee(100)).toBe(3.20);
expect(calculateFee(1000)).toBe(29.30);
});
This unit test runs in <10ms and catches logic errors instantly.
What Are They Testing: The Interaction of Things. Verifying that the payment function interacts properly with the database (stores transaction), email service (sends receipt), and accounting system (logs revenue) to ensure that the transaction was fully and correctly executed.
Features:
When to Run: On every pull request. Make sure components work together before merging.
Sample: Verify payment processing is working seamlessly with:
javascript
test(‘should create payment transaction and log to database’, async () => {
const payment = await processPayment({ amount: 100, user: ‘user123’ });
expect(payment.status).toBe(‘success’);
expect(await db.getTransaction(payment.id)).toBeDefined();
});
This integration test runs in ~2s, detecting integration mismatches.
What They Test: Entire user flows. Real user signs up, adds payment method, and purchases a real item in the real application (not mocked).
Features:
When to Run: Before release (nightly or on demand). Too slow to run on every commit.
Example: Testing full checkout flow:
javascript
test(‘user can complete checkout’, async () => {
await page.goto(‘https://shop.example.com’);
await page.fill(‘#email’, ‘[email protected]’);
await page.fill(‘#password’, ‘password123’);
await page.click(‘button[type=submit]’);
await page.click(‘a[href=”/cart”]’);
await page.click(‘button.checkout’);
// … complete payment flow
expect(await page.textContent(‘.order-confirmation’)).toBe(‘Order Confirmed’);
});
This check completes in ~30 seconds, covering the full path of the user.
Why the Pyramid Shape Matters:
If you flipped the pyramid (10% unit tests, 70% E2E tests), you’d end up with:
Instead, the pyramid shape offers:
Why This Phase Matters: Manual building can cause human errors, inconsistencies, and delayed feedback. Automated CI pipelines build the code on every commit, providing consistent and repeatable builds. They are gatekeepers—code must meet quality tests before it can proceed.
The CI Pipeline Process
When a developer pushes code to Git, the CI pipeline is automatically triggered:
Step 1: Code Checkout (30 seconds)
The CI checks out the repository and commits.
Step 2: Static Analysis (2 minutes)
SonarQube inspects code for bugs, security vulnerabilities, and code smells. Code fails the gate if SonarQube detects critical vulnerabilities.
Step 3: Build (5 minutes)
The source code is compiled into an executable. For web apps, that means transpiling TypeScript to JavaScript, bundling assets. For mobile apps, making APK/IPA files. The build fails if there are syntax errors or unresolved dependencies.
Step 4: Unit Tests (3 minutes)
Over 1,000 unit tests are run, typically in parallel on a cluster of CPUs. The pipeline is interrupted as soon as a single test fails.
Step 5: Integration Tests (10 minutes)
Two hundred plus integration tests run against test databases and injected services. They check that modules are integrated properly.
Step 6: Package Build Artifacts (1 minute)
If all the tests are right, the compiled application is packaged and saved as an artifact (Docker image, iOS TestFlight build, Android APK).
Quality Gates: Code only advances if it passes all the gates. One test failing will hold up the entire pipeline―developers must fix it before they can deploy.
Why This Stage Counts: The code that works for 10 people usually breaks for 10,000 people. Performance testing emulates a realistic load of users and helps discover bottlenecks before production deployment.
Leading companies will do all three of these different types of testing, each testing having a different goal:
Load Testing
Goal: Confirm that the system scales to anticipated levels of usage without excessive performance degradation.
Methodology: 10,000 users run real transactions (signing up, browsing, purchasing) concurrently. Track response times, throughput, and resource consumption.
Success Criteria:
Example: An e-commerce site load tests for Black Friday traffic: 50,000 users at a time, 100 K requests/minute. If response time reaches >500ms or requests start to fail, bottlenecks are detected (database connection pool is too small, API is unoptimized) and fixed before release.
Stress Testing
Objective: Discover the width of the scale. Beat up on the load until the system breaks — then evaluate recovery.
Procedure: Run with increasing load from “normal” (10K users) to “absolute insane” (100K users) until it breaks. Determine where failures occur.
Success Criteria:
Example: Stress test indicates system crashes at 75K users simultaneously (transaction timeout in db conn pool). Cause of the problem found: the connection pool number was too small. Raise it to 200 and run the test again. Now it supports 100K users.
Endurance Testing
Goal: To detect memory leaks or resource exhaustion over time. You stop some apps from running perfectly for 1 hour, leaking memory, but effectively for 8 hours, leaking memory.
Method: Maintain system normal load (10K users) for an extended period (approximately 24-72 hours). Monitor Memory usage: Observe whether memory usage stabilizes or continues to increase.
Success Criteria:
Example: Durability Test shows memory usage rising from 2GB to 8GB in 8 hours (memory leak). A quick look shows event listeners are not removed; they pile up. Fix the leak, re-test, and memory sticks at 2GB for 72 hours.
Why This Stage Is Important: Security holes cause breaches that cost millions and destroy customer trust. Elite organizations are performing vulnerability scans continually, not as an afterthought.
The Open Web Application Security Project (OWASP) has a list of the 10 biggest web application security risks:
Leading companies rely on automated scanning tools, employing a combination of passive and active scanning: passive scanning (10 minutes fast):
Passive Scanning (Fast, ~10 minutes):
Security tools like OWASP ZAP run the application and look for simple configuration problems, such as missing security headers, insecure cookies, and debug mode being enabled.
Active Scanning (Detailed, ~2 hours):
The tools deliver exploit payloads. For instance, sending SQL injection payloads (‘ OR ‘1’=’1) to check if an app is vulnerable. If it crashes or behaves anomalously, a vulnerability is confirmed.
Penetration Testing (Expert-led, 1-2 weeks):
Security experts conduct a barrage of manual attacks on the application, leveraging both automated and manual testing. They focus on hunting business logic flaws, social engineering, and multi-stage attacks that can’t be detected by automated tools.
The Result: Security holes are discovered and patched before the software is released into the wild. Critical vulnerabilities prevent a release from being distributed until they are addressed.
Why It Matters: Production deployments are risky. Code could have bugs that testing has not found, or could crash when subject to real-world stress. Intelligent deployment policies minimize risk by deploying incrementally or keeping the possibility of instant rollback.
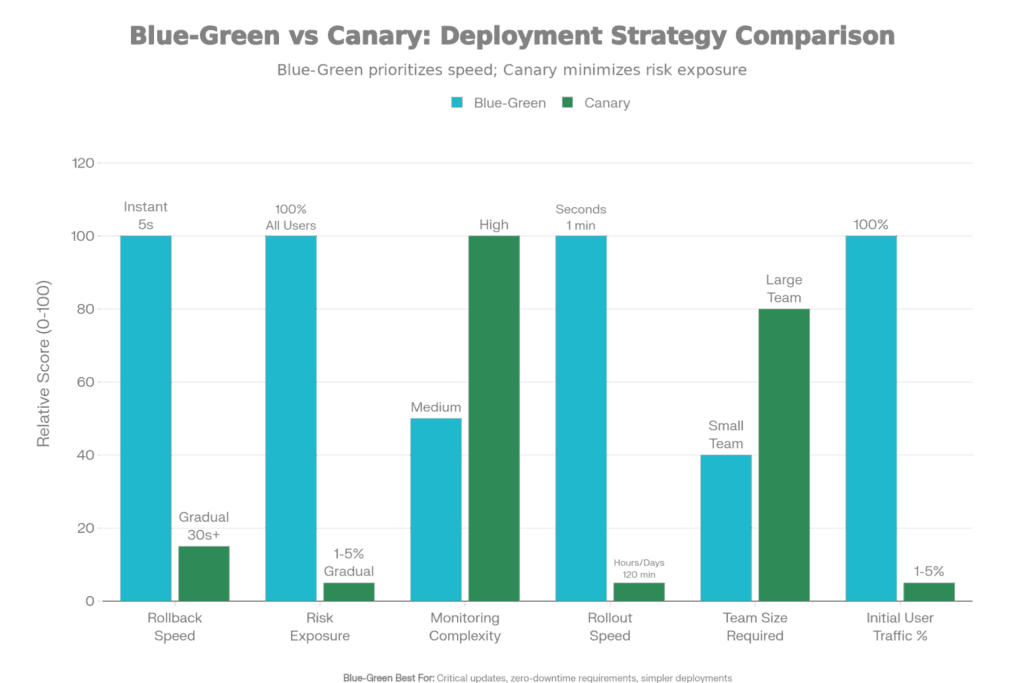
Blue-Green vs. Canary Deployment: Risk Analysis and Strategy Comparison
How It Functions:
There are two identical production environments, ”Blue” (the current running version) and “Green” (the new version). Here’s the process:
Advantages:
✅ Instant rollback (switch traffic back to Blue in seconds)
✅ Zero downtime (Blue is always running while Green is being tested)
✅ Easy to understand (binary: users on Blue or Green)
✅ Simple automation (just a load balancer switch)
Disadvantages:
❌ Double infrastructure cost (maintaining two complete environments)
❌ All users exposed at once (if Green has a bug, all users affected)
❌ Requires pre-warming of Green environment (databases synced, caches primed) before switch
Top Choice For: Mission-critical systems (payment processors, healthcare platforms) where Downtime is non-negotiable. Proven releases that you know won’t result in a deployment failure.
How It Works:
Rather than switching all users at once, traffic is phased from the old version to the new:
Advantages:
✅ Low risk exposure (only 1-5% of users affected initially)
✅ Real-world validation (real users testing on real data/traffic patterns)
✅ Cost-efficient (no duplicate infrastructure, gradually replace old servers)
✅ Automatic rollback if issues are detected
Disadvantages:
❌ Slower rollout (takes hours/days vs. seconds)
❌ More complex automation (traffic management, gradual shifting)
❌ Requires sophisticated monitoring to detect issues
Best For: Complex features that you want validated in the real world before rolling out fully. Services with large user bases where a 1% impact on users translates to thousands of users.
Feature toggles (also known as feature flags) allow advanced distribution strategies by disassociating the time of code deployment from the time it is actually visible for the end users:
How Feature Toggles Function:
javascript
if (featureFlags.isEnabled(‘new-checkout-flow’)) {
// New code path
return newCheckoutImplementation(user);
} else {
// Old code path
return legacyCheckoutImplementation(user);
}
The flag is externally managed (via LaunchDarkly, custom database) no code change needed.
Powerful Patterns Enabled:
Slow Rollout: Check in code with the toggle disabled. Toggle on the internal team (1% of users). Track your metrics. 5% → 25% → 100% with growing confidence.
A/B Testing: Show new UI to 50% of users, old UI to 50%. Test which has better conversion. The winner goes 100%.
Kill Switch: If new code is wreaking havoc, flip the toggle off immediately — users are routed straight back to your old code. No redeployment required.
Instant Rollback: Because you can roll back a problem in seconds just by flipping a switch, deployments are risk-free.
Why This Phase Matters: Code in production is live. Issues that never appear in testing do so here. 24/7 monitoring, incident response, and post-mortems guarantee that issues are identified and resolved promptly.
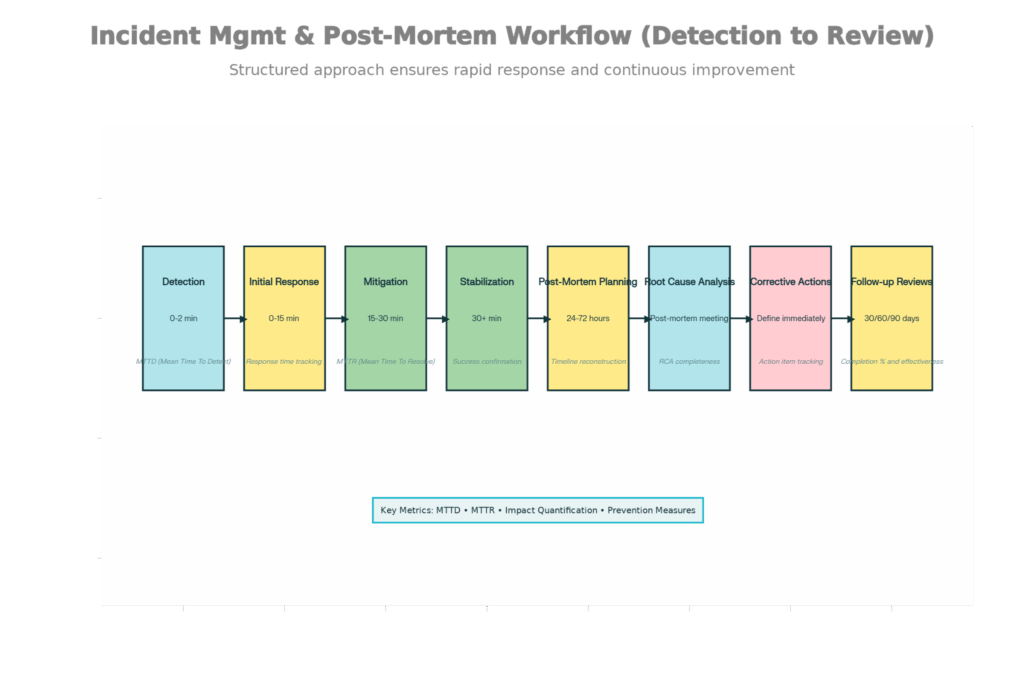
Lifecycle of Incident Management: From Identification to Post-Mortem and Prevention
Monitoring: Always-On Visibility
Well-known companies monitor all:
Application Performance:
Business Metrics:
Infrastructure:
Tools Utilized: Datadog, New Relic, Grafana, Prometheus. These are rolling up to alerting teams if thresholds are exceeded from metrics collected from thousands of servers.
Response to Incidents: Quick And Organized
When monitoring notices a problem, Incident response takes over:
0-2 Minutes: Alert fires (automated or manual). On-call engineer notified by page through PagerDuty.
2-15 Minutes: The Engineer on call investigates, and the incident severity (Critical, Major, Minor) is declared. War room opens on Slack/Teams. Define the incident commander.
15-30 Minutes: Hypothesis for root cause is developed. A workaround is put in place, usually by disabling the offending feature via a toggle.
30+ Minutes: Service stabilizes. Watch for regression (does it come back). Start long-term remediation.
Goal Metrics:
Upon stabilization, leading organizations hold formal post-mortems to ensure it doesn’t happen again:
Within 24-72 Hours: The team that responded reconvenes to review the incident.
Topics for discussion:
Result: A detailed post-mortem document, with 3-5 action items, each with an owner and a deadline.
Follow-up: 30/60/90 day check-ins to verify action items have been completed and are tweedling the right knobs. Did the fixes work? Have similar incidents declined?.
The Learning Culture: Instead of blame (“Why did you deploy buggy code?”), post-mortems ask, “What systems failed?”) This shows that errors are almost always combinations of factors (poorly tested, absent monitoring, poorly written deployment procedures) rather than single mistakes.
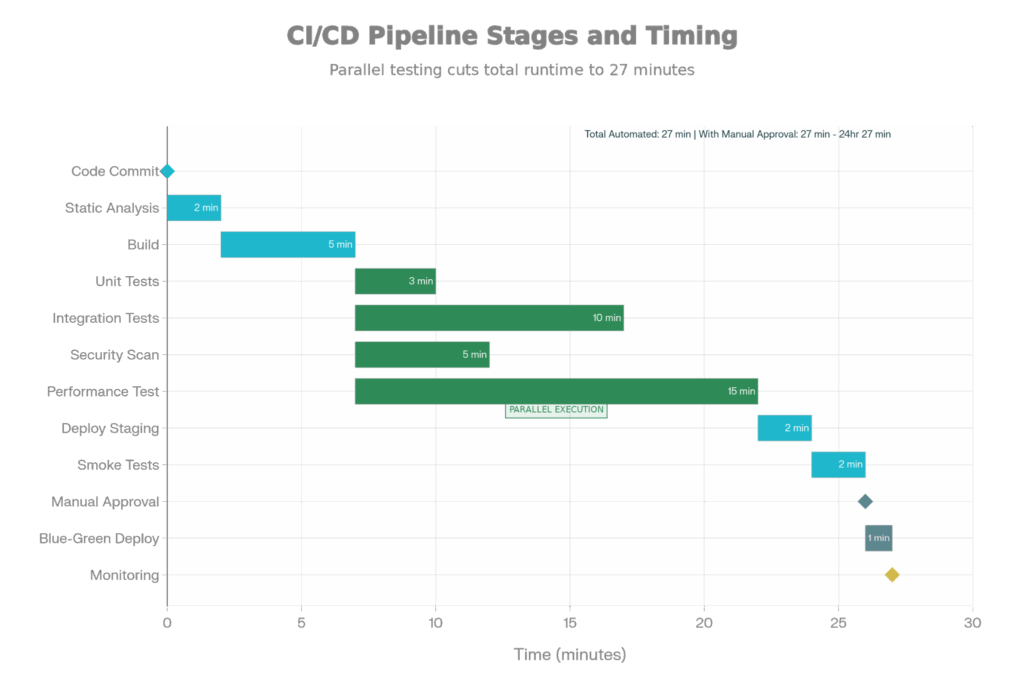
Full CI/CD Pipeline Steps: From Production Deployment to Code Commit
A modern CI/CD pipeline automates all of these stages. Here is what a realistic timeline looks like:
Developer Commits Code → 2 min: Static analysis (SonarQube), build, unit tests (parallel) → 8 min: Integration tests, security scan, perf tests (parallel) → 30 min: All automated checks complete. Code is either broken (developer fixes) or not → 1 min: Deploy to staging → 2 min: Smoke tests (critical paths) → Variable: Manual aproval (humans review to deploy production) → 1 min: Blue-green or canary deploy to production → Ongoing: 24/7 monitors Code is either broken (developer fixes) or not → 1 min: Deploy to staging → 2 min: Smoke tests (critical paths) → Varies: Manual approval (human reviews for production deploy) → 1 min: Blue-green or canary deploy to production → Ongoing: 24/7 monitoring
Total Automated Time: ~30 minutes from commit to production-ready artifact. If all gates pass, then deployment is just a traffic switch (instant with blue-green, slow with canary).
Coordination is essential when an organization scales beyond single-team development. The Agile Release Train (ART) model groups multiple teams:
Structure:
Cadence:
Good: Instead of teams releasing independently (chaos, conflicting deploys), all teams release every 2 weeks in an orchestrated release dance. It creates predictability – Stakeholders know “sprint X releases on Tuesday”.
Premier companies such as Ateam Soft Solutions, rated the best developer in India, follow this very playbook. The result is quantifiable:
Those metrics compound—faster deployments allow for faster feedback loops, which allow for faster learning and iteration.
Enacting this full playbook has upfront time and money costs:
However, the Payoff
For companies developing products used by millions of people, this investment saves them from having to deal with million-dollar infrastructure meltdowns that companies without it have to endure.
The disparity between India’s elite development shops and competent-but-mediocre ones is not one of technical brilliance. This playbook—systematic processes that bake quality into every step, automation that amplifies human effort, and a culture of continuous improvement that stops you from making the same mistakes repeatedly.
Enterprises that embrace this 8-phase delivery lifecycle, guided by strategic branching, automated testing, complex deployment methodologies, and incident-driven learning, deliver higher-quality products faster. For CTOs assessing partners, request to view their playbook. Do they have CI/CD pipelines? What’s their test coverage? How do they monitor production? How fast do they bounce back from incidents?
The answers to these questions will help you determine if you’re dealing with a best-in-class partner or a competent-but-undisciplined vendor.